Have one of our starters?
Caring for Your Sourdough Starter
Here’s how to keep your Mom’s Bread Co. starter happy and thriving! With just a little care, your starter will stay strong and ready to bake whenever you are.
What You’ll Need
- A clean glass jar or container
- Flour (any unbleached type works great)
- Filtered or bottled Spring water
- A spoon (and maybe a kitchen scale if you like to be precise)
If You Bake Often
If you bake every day or every few days, keep your starter at room temperature.
- Scoop out (or “discard”) about half of your starter — this keeps it from growing too large.
- Add equal parts flour and water (about ½ cup each, or 50g each if you’re weighing. This is called a 1:1:1 ratio.
- Stir well and leave it loosely covered on the counter.
- Feed it about once every 24 hours, or sooner if it’s bubbly and starts to fall.
If You Bake Once a Week (or Less)
If you’re not baking often, your starter can rest in the fridge between bakes.
- Give it a feeding before refrigerating (equal parts starter, flour, and water).
- Let it sit at room temperature for an hour or two so it starts bubbling.
- Then cover it and pop it in the fridge.
- Once a week, or the day before baking, take it out, let it warm up, and feed it again.
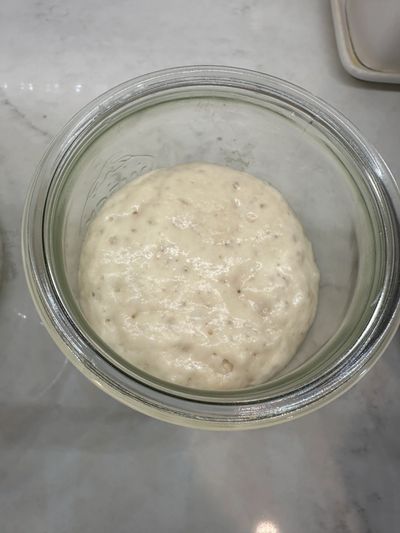
A Happy Starter Looks Like
- Bubbly and a little stretchy
- Doubles in size within a few hours of feeding
- Smells pleasant — slightly tangy or fruity
When It’s Ready to Bake
Your starter is at its best when it’s light, bubbly, and just starting to fall after a feeding. That’s when it’s strong, active, and ready to raise your dough.
Don’t Worry — It’s Hard to Mess Up!
Even if you forget to feed your starter for a few days, it can usually bounce back with a couple of regular feedings. Be patient, and it’ll come back to life in no time.

Mom's basic original loaf recipe

Makes one loaf
325 g filtered water
100 g active bubbly starter
500 g bread flour (Mom uses King Arthur)
10 g sea salt or pink salt
Step 1: Mix
- In a large bowl, stir together the starter and water until mostly dissolved.
- Add the flour and mix with your hand or a spoon until no dry bits remain.
- Cover the bowl with a towel and let it rest for 30 minutes — this step is called the autolyse and helps the dough hydrate.
- Sprinkle in the salt and gently mix or pinch it into the dough until well combined.
Step 2: Stretch and Fold
This replaces kneading and helps the dough build strength.
- Wet your hand to prevent sticking.
- Grab one edge of the dough, stretch it up, and fold it over the center.
- Turn the bowl a quarter turn and repeat — do this four times for a full round.
- Cover and let rest 30 minutes.
Repeat this three to four times over about two hours, letting the dough rest between sets. By the last round, the dough should feel smoother and hold its shape better.
Step 3: Bulk Fermentation
After the final fold, cover the bowl and let the dough rest until it’s puffy, airy, and has risen about 50 percent. This may take 4–6 hours depending on room temperature.
Step 4: Shape and Final Proof
- Lightly flour your counter and turn the dough out
- Gently shape it into a round or oval loaf, tucking the edges underneath to create surface tension.
- Place the dough seam-side up in a floured bowl or proofing basket.
- Cover and refrigerate overnight (8–12 hours) for the final rise and flavor development.
Step 5: Bake
- Preheat your oven (and Dutch oven, if using) to 450°F for at least 30 minutes.
- Turn your dough onto parchment paper, score the top with a sharp knife, and carefully place it into the hot pot.
- Cover and bake for 25 minutes, then uncover and bake another 20–25 minutes until golden brown.
- Cool completely before slicing to allow the crumb to set and the flavor to develop.
Tips for Success
- Don’t rush fermentation — sourdough loves time.
- Every kitchen is a little different, so trust your eyes and hands more than the clock.
- If your dough feels sticky, that’s normal. Use damp hands and gentle movements.
Contact Us
Have questions or comments? We're always here to help. Contact us today and we'll get back to you as soon as possible.
This website uses cookies.
We use cookies to analyze website traffic and optimize your website experience. By accepting our use of cookies, your data will be aggregated with all other user data.

